Add one more to receive a free gift 🎁
HELP CENTER
MINIMAL DASHBOARD MOUNT
FAQ’s
Our mount is designed to be a universal fit for any vehicle, but do not install it on leather & textured surfaces. The surface area should be flat and smooth.
Apply even pressure for 30 seconds and after installation, for maximum adhesive strength wait 12 hours before usage.
It’s compatible with all phone models. As long as you have the metal plate installed then it will work with any device.
Yes, our mount works with phone cases.
When installing the metal plate inside your case, be sure to test if the hold is strong enough. If the case is too thick, then the plate needs to be placed on the outside.
Our mount is strong enough to hold any smartphone. Two mounts is recommended to hold a tablet.
No, the MagSafe function in iPhone models 12 and up is not strong enough to securely hold the phone in different road conditions.
Our magnetic solution is 3x stronger, which is enough to ensure that the phone stays firmly put even off-roading.
If placed in the middle, the plate will block wireless charging.
The following solution is for wireless charging users: Install the plate to the very bottom of the phone, horizontally. Then it won’t interfere with the wireless charging positioned in the middle of the phone.
Just peel it off slowly. It comes off clean, without leaving any residue behind.
There’s also an extra nano sticker included in every CARMOUNT set if you want to re-install the mount.
No, they are not reusable, but each set includes two metal plates.
To remove a plate from your phone or case:
- Slide something thin, like an old credit card, under the edge of the plate.
- Gently lift one side and slowly peel it off.
If you need additional metal plates, you can purchase them in our shop.
For larger devices, using two mounts is necessary to ensure stability and security.
Ensure that the metal plates are not installed inside the case.
The metal plates should be placed on the outside to have direct contact with the magnets, ensuring a strong and secure hold.
Yes, our Dashboard Mount is designed to withstand hot summer temperatures.
Unlike competitors that use regular 3M tape, we use a special blend of nano glue that is more weather-resistant and adheres better in higher temperatures.
We have tested the Dashboard Mount in conditions up to 100°F (140°F inside the car) throughout the summer without any issues with the nano glue failing.
We have tested the Dashboard Mount in -22°F throughout the winter without any issues with the nano glue failing.
Officially, our tape can withstand temperatures as low as -40°F.
However, ensure that the car is warmed up to a normal temperature before installing the Dashboard Mount.
No, it doesn’t.
The concern about magnets stems from older technology, like televisions, where data was stored using magnetic bits.
However, modern smartphones are not affected by magnets. In fact, smartphones already contain magnets inside them.
You can rest assured that using our Dashboard Mount will not interfere with your phone’s functionality.
No, it won’t.
Our Dashboard Mount uses a special blend of nano glue designed to adhere strongly without leaving any sticky residue.
When you remove the mount, it will come off cleanly without damaging your dashboard.
If any residue remains, it can be easily cleaned with a mild adhesive remover or soapy water.
TROUBLESHOOTING
STEP #1 – CarMount™ installation
1. Find the best spot in your car. (avoid leather & textured surfaces)
2. Clean the spot with alcohol wipes + dry wipes.
3. Install the CarMount™ and add pressure for 30 seconds.
4. Wait 30 minutes before using the CarMount™.
STEP #2 – Metal plate installation (If you use a case that is too thick, please install the metal plate outside the case)
1. Clean the spot with alcohol wipes + dry wipes.
2. Install the metal plate and add pressure for 30 seconds.
3. Wait 30 minutes before using.
It is basically impossible that the CarMount™ can’t hold a smartphone.
It all depends where you install the metal plate and if your phone case is compatible installing the metal plate inside the case or not.
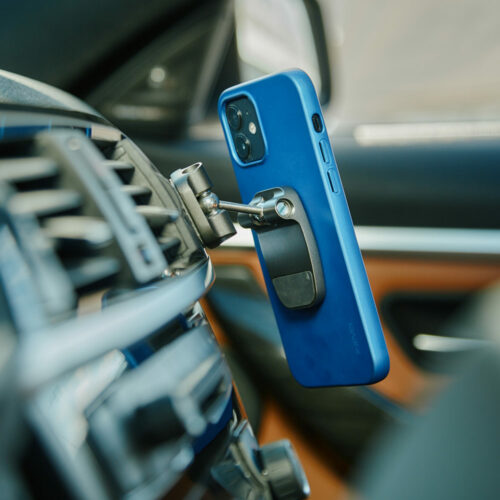
If you case is not compatible installing the metal plate inside the case (battery case, wallet case, MagSafe case or too thick case) install the metal plate outside the case, as shown in the video above.
Main reason why CarMount™ didn’t stick to your dashboard is because the installation spot was not cleaned carefully or the dashboard’s material is not compatible for CarMount™, avoid leather & textured surfaces.
The nano glue we are using can be resticked, follow the instructions:
- Wash the glue part under the water and dry it completely with a blowdryer. Make sure you don’t touch the glue part with your fingers.
- Go to your car and clean the new installation spot with alcohol wipes + dry wipes.
- Install the CarMount™ and add pressure for 30 seconds.
- Wait 30 minutes before using the CarMount™.
P.S. if you still fail to install the CarMount™, use the extra sticky that was included with your CarMount™.
CARMOUNT™ Removal:
- Remove CarMount™ slowly, in a steep angle.
- Remove the old sticky
- Install the new sticky.
PS. Do not use excessive force while removing the product. Apply some heat (hair dryer would be perfect) and the adhesive should let go more easily. We are not responsible for any damage caused while using excessive force.
CARMOUNT™ Re-installation:
- Find the best spot in your car. (avoid leather & textured surfaces)
- Clean the spot with alcohol wipes + dry wipes.
- Install the CarMount™ and add pressure for 30 seconds.
- Wait 30 minutes before using the CarMount™.
Our mount works with wireless charging but it’s important that you stick the metal plate at the bottom, horizontally. So that the metal sheet won’t interfere with the wireless charging positioned in the middle of your phone.
It is recommended that you stick the metal plate outside the case that way, unless you have a really thin case. Test it first before applying the metal plate.
COMPATIBILITY
STEP #1 – CarMount™ installation
1. Find the best spot in your car. (avoid leather & textured surfaces)
2. Clean the spot with alcohol wipes + dry wipes.
3. Install 2x CarMount™ and add pressure for 30 seconds.
4. Wait 30 minutes before using the CarMount™.
STEP #2 – Metal plates installation (Not for tablets with cases)
1. Clean the spot with alcohol wipes + dry wipes.
2. Measure the CarMount™ distance in the car.
3. Install the metal plates and add pressure for 30 seconds.
4. Wait 30 minutes before using.
OPTION #1 – Install metal plate inside the outer rubber layer
1. Open the Otterbox Defender case
2. Install the metal plate in the middle, between the outer rubber layer, and the inner plastic layer of the case.
OPTION #2 – Install metal plate outside the case for extreme hold
1. Clean outside the case with alcohol wipes + dry wipes.
2. Install the metal plate and add pressure to every part of the metal plate.
3. Wait 30 minutes before using.
Install the Metal plate at the bottom horizontally
1. Clean the spot with alcohol wipes + dry wipes.
2. Install the metal plate and add pressure for 30 seconds.
3. Wait 30 minutes before using.
CARMOUNT™ works with a Loopy Case.
- Install the metal plate inside the case, next to the Loopy, vertically.
- If you want to use your phone in vertical mode, rotate the CarMount to vertical position.
- If you want to use your phone in horizontal mode, rotate the CarMount to horizontal position.

